Select Column
The "Select Column" option is available in the drop down screen under the "Database" tool option. The
"Select Column" tool allows you to change the columns that are displayed in the "View All" tab. Since
the "View All" tab prints in a "What you see is what you get" mode, you can use the "Select Column" to
make quick custom reports.
To use the "Select Column" option from the "View All" tab, click on the "Database" tool option at the
top of the program and in the drop down window click on the "Select Column" option in the drop down
window. See the screen shot below.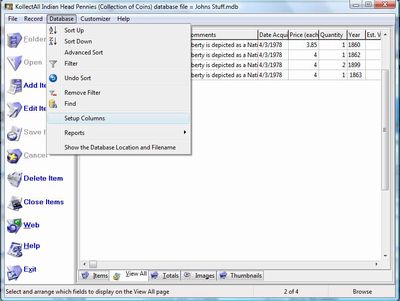
When you click on the "Select Column" option in the drop down window, a pop up widow appears with
all the columns that are available in the "View All" tab, you simply need to check the ones you want
to see and un check the ones you don't want to see in the "View All" tab. See the screen shot below.

Additionally, once you have the columns displayed that you want in the "View All" tab, you can also
drag and drop a column to a new spot and resize a column, this provides you with the ability to create
a custom report that you can print out. To move a column, click on the column heading at the top of the
"View All" tab and while holding down the mouse button drag it to the spot you want to place the column.
To resize a column, move the mouse pointer to the separator bar between two columns and then click the
mouse button and drag it left to make the column smaller or right to make it larger. See the screen shot
below. 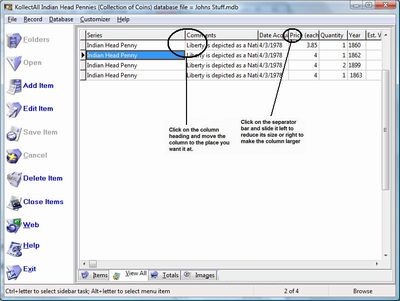
Options under the "File" tool.
- New Database
- Open Database
- Close Database
- Save Database as
- Address Book
- Import Custom Folder/Labels Template
- Export Custom Folder/Labels Template
- Delete Custom Folder/Labels from the Database
- Print Setup
- Print
- Backup
- Restore Backup
- Export
- Exit
Options under the "Record" tool.
- First
- Next
- Previous
- Last
- Insert
- Add Image
- Remove Image
- Launch Microsoft Paint
- Copy
- Paste
Options under the "Database" tool.
- Sort Up
- Sort Down
- Advanced Sort
- Filter
- Undo Sort
- Remove Filter
- Find
- Setup Columns on View All Page
- Reports
- Show Database Location and File Name
Options under the Customizer tool.
- Change Program Name
- Change Program Image
- Restore Defaults
- Change Labels
- Create Custom Labels
Options under the Web tools.
- OnLine Storage
- Web Hosting
- Website Templates
Options under the "Help" tool.
- Table of Contents
- Index
- Web Help
- About
|
|
Click here to take a tour of KollectAll

Take a tour

Click below for more details:

Main Splash Screen

Folder Screen
Item Screen
Image Viewer screen
View All screen
Totals screen
Reports

|